
Renovating a kitchen is no easy task whether you are doing your own DIY or having it professionally done. If you’re thinking about doing your own DIY, check out this four-part series where I share our own DIY Kitchen Renovation adventure!

This DIY kitchen renovation project had been in the works for years. I’m talking like 19 years! Yes, you read that right. We had already been living in our house for 19 years before we started this renovation. In the summer of 2020 the perfect opportunity presented itself to finally start this DIY Project.
I remember when we first bought our house I loved the kitchen and that peninsula counter came in handy for all the gatherings we’ve hosted. But over the years, it just didn’t work for us anymore. Plus we wanted to put our own design stamp on the kitchen and do it the way we felt it should’ve been designed when it was built.
Project Goals
My goals were simple: change the footprint for better traffic flow and infuse some farmhouse style into the finished design.
- Paint cabinet doors and facings
- Remove the peninsula structure (demo!)
- Change the cabinet footprint against the long wall
Overall I wanted a lighter and brighter look which was a far cry from our tired original oak wood cabinets, gold painted walls (which we painted!) and ugly faux wood vinyl flooring.
Project To Do List
- Empty cabinets
- Remove cabinet doors
- Remove hinges
- Take upper cabinets down
- Remove counter
- Tear out peninsula
- Remove electrical wiring
- Tear out corner sink cabinet
- Move plumbing
- Scrape down wall/ceiling
- Take out plant hooks from soffit
- Push cabinets against wall
- Secure front oven wall to side wall panels
- Sand, prime and paint all cabinets, doors and drawers
- Clean, sand & spray paint hinges black
- Paint window trim
- Replace upper cabinets
- Install new counter
- Fix sheet pan drawer under oven
- Install a decorative wood base under upper cabinets
This wasn’t an all-inclusive list, rather it’s a list of the major items we needed to address to get this kitchen functional again -remember we were doing this ourselves and still needed to use the kitchen along the way.
Before we dive in, I should also mention we had small overhead cabinets running the length of the peninsula. But we had removed those within a few years after being in the house. We just found them to always be in the way of seeing into the dining room. In their place we added some Tiffany-style task lights.
Getting Started Prep Work
Demolition day finally came and we started with pulling off all the cabinet doors and hinges. Both of which were repurposed by painting the cabinet doors and facings. We also cleaned up the hinges and spray painted them a rich satin black color.

There were a lot of cabinets and at times it felt like I was painting cabinets everyday. It was a very long process but also very rewarding. Since it was summer at the time of this renovation, most of the painting took place on the deck. But on the days it wasn’t nice outside or it was too hot, we brought the cabinet painting project into the dining room.
Next we pulled down the cabinets that were above the long (window) counter. Technically this didn’t need to be done. But we wanted the space from the cabinet to the window to be the same as the side of the wall oven.
Create New Footprint
This first phase or zone consisted of the long sink counter running down the left side of the kitchen to the wall oven. In order to start work on this phase we needed to tear out the peninsula counter, the corner sink cabinet and then push the cabinets against the wall.
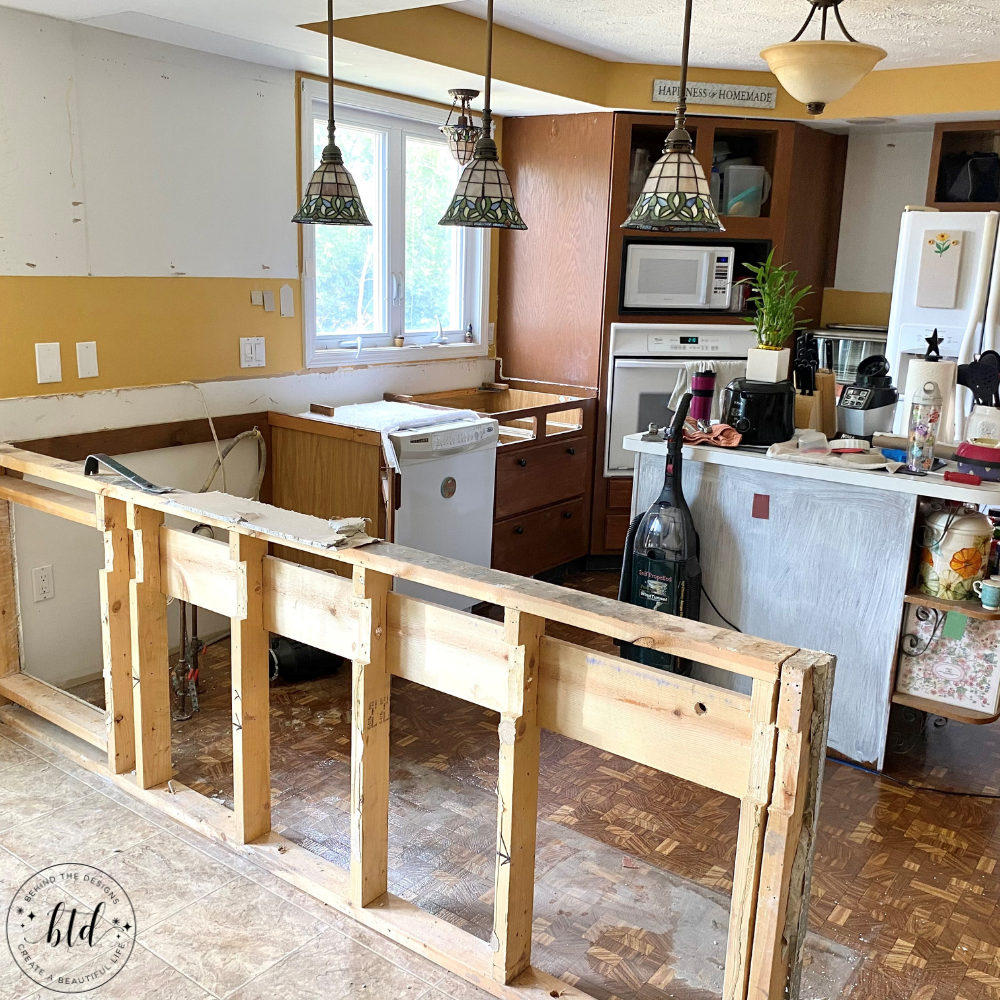
Once all of the cabinets and counters were removed, then the real demo took place which was to remove the peninsula structure. Let me say, that peninsula structure was beyond solid. It took some serious sweat equity to get that structure fully removed!
We also removed some unnecessary electrical wiring we no longer needed from the peninsula, as well as moved the plumbing from the corner to along the wall. While I would’ve loved to have moved the sink under the window, it just wasn’t in this kitchen project plan.
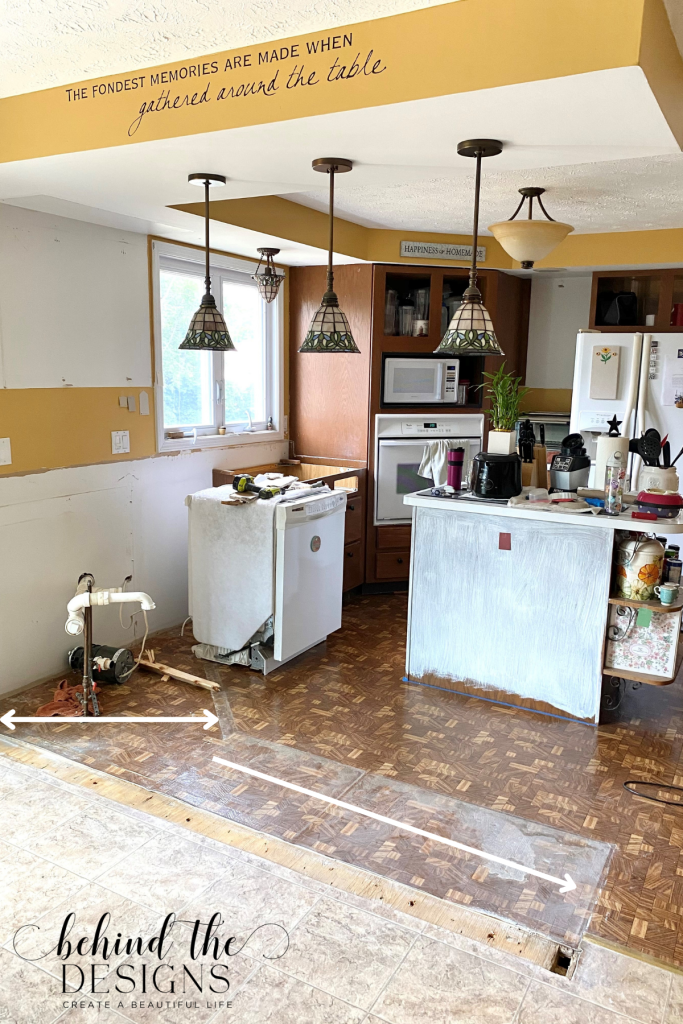
With the corner sink base gone and the peninsula removed we finally had an open floor plan between the kitchen and dining room. Just look at how much space we created!
Next we took stock of all the cabinets we had, how they opened and what their measurements were. Then we were able to reconfigure our kitchen footprint to push those cabinets against the long window wall. We extended into the dining room a bit but that was okay because we had the room to spare and that was our plan all along.
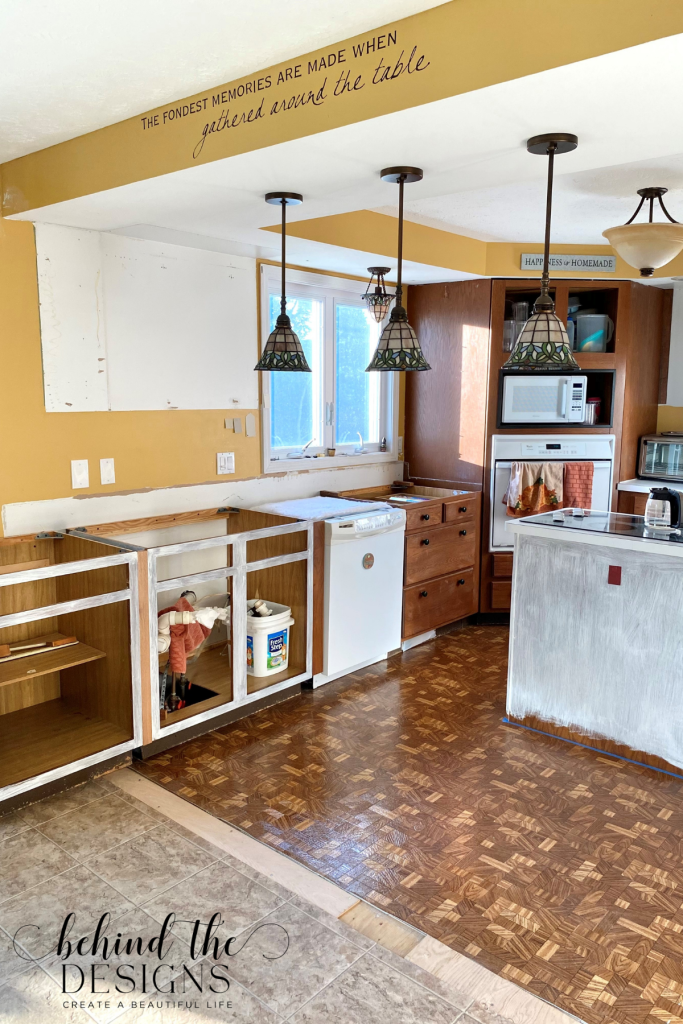
Finally the first part of our new kitchen layout was in place! I’m not gonna lie here either -the chaos in the kitchen and dining room during this period was sometimes unbearable. But we got through it by making sure we stayed on track with the project and modifying our temporary setup to suit our daily needs.
Keep It Functional
While it wasn’t a pretty sight, we did our best to make our daily kitchen use functional. This was where all the pre-planning came in handy because we knew what we were shooting for with each zone and we used that to our advantage. For example, by setting up a folding table down the middle of the kitchen for food prep.

Ultimately we knew were going to add a long kitchen island and having a folding table setup in the space gave us the advantage in taming the kitchen renovation chaos.
Under that folding table we stored the four wood crates we purchased on sale that we planned to use in the pantry (Part 3). We were then able to use those crates for additional storage. The cabinets weren’t 100% finished but we put the dishes in them anyway because it’s easier to get the dishes you need when they are organized.

Here is the mostly finished DIY Kitchen Renovation Part 1. The major goals were accomplished and there are just small tweaks to be done. Plus we still had to pick out a backsplash tile and paint the walls.
As for the soffit, we needed to extend the soffit along the top cabinets. But to do that we had to address the electrical in the peninsula soffit where the task lights hang from. We did get it all done…it just took time.
Make Budget Friendly
There are so many ways to make your kitchen renovation budget friendly. The key is to reuse and recycle what you already have. Here is how we were able to keep our DIY Kitchen Renovation budget friendly.
01. Keep It DIY
One major way we saved money was by making this a DIY project. When you outsource a kitchen remodel the cost of labor adds up quick.
02. Use Existing Cabinets
Another way we kept it budget friendly was by reusing as many of our current cabinets as we could and just painting them. Even though it would’ve been nice to have new ones, it just wasn’t the time to purchase new.
As we planned the layout we figured our only new cabinet purchase might have to be when we set up the island (Part 3). Which was going to be more than twice the size of the old footprint.
03. Use Existing Appliances
To keep costs down we decided to keep our existing faucet and sink which were in pretty good shape. Plus we kept all our appliances which didn’t look great in the new kitchen. But guess what? They worked so there was no need to replace them just yet.
Add Farmhouse Details
Trust me when I say, there are a lot of things that could’ve been done to get the full farmhouse look in this space that I want. But I had to stay focused on the functional DIY plan and not get hung up on the design details. So how did I add a little farmhouse style to my DIY Kitchen Renovation?
01. Use Farmhouse Paint Colors
One way to add a little farmhouse style to any home decor is through paint. Whether you paint your walls, doors or DIY furniture projects, choosing the right paint color matters to the overall feel your home gives. Below are some of the paints used in this renovation.
- Cabinet paint (Sherwin Williams Accessible Beige SW7036)
- Wall paint (Sherwin Williams Creamy SW7012)
Now is when I’m going to share with you a little error I made with our paints and this kitchen renovation. I had already finished at least 80% of the cabinets when I realized I accidentally painted them the wrong color!
The cabinets were supposed to be painted in the Creamy color and the walls Accessible Beige. But, that’s not how it went down and overall, I didn’t dislike it either! My tip for avoiding this error is to take a piece of painters tape, write the cabinet color on it and then stick it to one of the cabinet doors.
But, having a lighter wall color actually worked out perfectly because now when the sun is shining these two rooms are flooded with warm bright sunlight -and I love that!!

02. Add Farmhouse Sunflowers
Adding sunflowers to your overall decor and design just instantly screams farmhouse. I added in this decor detail in a few places.
- Fresh and faux sunflowers (although fresh is always better!)
- Black metal cabinet knobs with a sunflower pattern on the front
There is no shortage of sunflowers in my home decor! In our dining room I’ve always added the Fall Tiered Tray Decor in Farmhouse Sunflowers and; this DIY Curio Cabinet Makeover floats between our foyer and dining room.

03. Add Shiplap
You undoubtedly know this already because anything farmhouse always involves shiplap. But you almost always hear of it being put on walls. When you DIY you get to add creative ideas where ever you want!
After most of this zone was completed I decided I wanted to add shiplap to the ends of the exposed cabinets. These were painted the same color as the cabinets and are the side that faces the dining room. Adding this one small detail really elevated the overall look.
04. Add Galvanized Metal or Copper Details
For even more farmhouse appeal I added a galvanized sitting stool. I also hung a few galvanized metal wall signs to both the kitchen and dining room.
Next post in this series is Part 2 where we updated the mini cabinet area between the wall oven and refrigerator. That post will be much shorter, promise!
If you are inspired to DIY your own kitchen renovation or makeover don’t forget to share by tagging me on Instagram and using #btdinspired, I’d love to see your work (and I just might repost your photo)!


Want to always be in the know? Be sure to subscribe to the newsletter to receive emails of all the latest blog posts and get the first scoop about any digital printables and freebies.
Join me on Instagram, Pinterest, Facebook and the Creative Planning Expressions Community to see what I’m up to as I Create A Beautiful LifeTM!
xo, Stephanie
Get 10 Tips To Simplify Your Planner
Whether you are downsizing your planner or just need a new direction and reset for a new quarter.

Behind the Designs planner printables are designed as planning tools to help you stay organized & eliminate overwhelm. Explore the Shop →